Setting up RESTful services on a J2EE service oriented architecture
This is the first in a series of blog posts in which we give an answer to the question “How do I setup RESTful services on a J2EE technology stack?”. We begin with a bare minimal codebase which we will gradually expand in future articles. Working code samples will guide you through the process of understanding REST concepts and they will teach you how the chosen technology handles the job. Technology cornerstones are Java, Spring, JAX-RS (with RestEasy) and Hibernate. There are several other libraries, supporting tools and applications that we will familiarize you with at the right time. For example, we use Postgres as database platform and Tomcat as application server, our project is built with maven and our codebase is hosted on github.
On RESTful services
REST is basically centered around the abstract concept of ‘resources’ (URLs) and performing operations on these resources via the HTTP protocol. A RESTful service should always be stateless. This is key to a scalable architecture. It enables you to multiply your service instances over any number of (virtual) servers. Examples of public REST interfaces are the Graph API of Facebook and the Flickr REST API.
You need a strict separation between client and server concerns. Clients manage the user interface (if any) and user state whereas servers don’t keep any user state between requests but execute complex business processes during each request and handle persistent data storage.
There is a summarizing WikiPedia page on REST and there are several presentations on REST on InfoQ that serve as good resources in case you want to better align yourself with the REST concepts first. We go straight to the practicalities of setting up your first REST project now.
Setting up the project

The santorini project structure
We always create seperate modules for the service’s (REST) API and its implementation. This is a natural separation, prevents you to accidentally use implementation classes in the API and allows you to distribute the API module to clients. We also create a separate web module for client code and the servlet entry point.
The resulting maven structure is shown in the figure on the right. Notice that there are three pom.xml files: one parent pom.xml in the root folder and one pom.xml for each module. Before continuing reading the article, this is a good point to get your hands on the accompanying code.
Checkout the codebase using git by executing – git clone https://github.com/Qmino/Santorini.git – in a terminal window or using one of the many graphical git clients. One brilliant client is definitely the free SourceTree app from Atlassian. Once you have the repository cloned, update it to the first revision by executing git checkout -f initial or use your graphical git client. Open the project in your preferred IDE (likely Eclipse or IntelliJ) or build the code by executing mvn install from the root of the codebase. You obviously need to have Java and maven installed to get the build process going.
You may have noticed the recurring directory structure under each module. This is the default maven source layout for Java applications. Our Java packages will live under the java folder and our non-java files such as configuration files go under resources. We will later also add the test directory under src. Maven is not only a build tool, but also a dependency management tool that automatically fetches your project’s library dependencies from central repositories. Those dependencies are configured in the pom.xml files we mentioned earlier. Just ignore those files a little longer. We will explain the dependencies we need after creating our domain model and a handful initial services.

The initial Santorini model
The travel agency
Our sample code implements web services for an online travel agency with the single purpose of explaining the ideas behind creating REST services to expose a business online. Since it is a toy application, it may obviously lack some of the more realistic processes a business of that nature needs. Just bear in mind that it is made for educational purposes. Now, let’s design…
Our first user stories will be:
- A traveler can view all available trips.
- A traveler can view a detailed description of a selected trip.
- A traveler can book a trip.
The self-explaining concepts in the initial domain model we built to support these services are Trip, Traveler and Booking. They are related to one another as shown in the figure on the left. Apart from the trip details, each trip maintains a list of bookings on that trip. A booking relates a traveler to a specific trip and the traveler object stores a traveler’s details together with his booked trips. Checkout the tag firststories (git checkout -f firststories) from our repository to see this model in the santorini-services module in your IDE.
In the next figure you see the TripService interface that contains our public service API. You can find it in the com.qmino.santorini.service package inside the santorini-api module. Here is where the first REST concepts seep in by means of Java annotations. @Path points out where the service should be hosted relative to the base URL that points to where our war file will be hosted on our application container (e.g. Tomcat server). The path annotation on the interface level sets the start path for all methods in the interface, whereas the path annotation on the methods complete the URL for a specific REST resource. Path parts that sit between braces such as {tripId} are parameterized. That means that all resources that match /rest/trips/{tripId} where {tripId} is replaced by a Long value will execute the method getTripInfo when a request is sent to it. However, not any request on this URL will execute the method. The @GET annotation and @Produces(MediaType.APPLICATION_JSON) annotation together point out that only HTTP GET methods accompanied with an Accept header with the value application/json will be routed to the getTripInfo method. The @PathParam(“tripId”) injects the path parameter tripId into the methods call’s parameter tripId. Together, these method annotations define how a REST request is transformed into a Java method call.
@Path("/rest/trips")
public interface TripService {
   @GET
   @Path("/")
   @Produces(MediaType.APPLICATION_JSON)
   List getAllAvailableTrips();

   @GET
   @Path("/{tripId}")
   @Produces(MediaType.APPLICATION_JSON)
   TripTo getTripInfo(@PathParam("tripId") Long tripId)
      throws NoSuchElementException;

   @POST
   @Path("/book")
   @Produces(MediaType.APPLICATION_JSON)
   @Consumes(MediaType.APPLICATION_JSON)
   BookingConfirmationTo bookTrip(BookingRequestTo bookingRequestTo)
      throws BookingException;
}
The result of the method call on getTripInfo is a TripTo object. TripTo is a Transfer Object (TO), sometimes also called Data Transfer Object (DTO), but we prefer the shorter term. Transfer objects define which data can be sent to or can result from calling upon a REST resource. Since maintaining a good separation of concerns in building a software system is a good thing, we should never use any domain objects directly in the service interfaces. It actually can’t be done since we defined our domain concepts in a separate module (santorini-services) and, as we will show later, the santorini-services module will depend on santorini-api and not the other way around. Finally, we have one annotation left: @Consumes(MediaType.APPLICATION_JSON). This annotation defines how the Content-Type header of a REST request must look like, e.g. application/json. The bookTrip method has a method parameter bookingRequestTo that is not preceded by an annotation. Such parameter defines the expected request body, in this case a BookingRequestTo object.
Now you may wonder how the transfer objects, which are Java objects, are transformed into their appropriate request or result format, JSON in our case. It is done by the same magic that exposes the REST resources based on the above annotations and routes requests on them to the appropriate Java method. The framework that handles the magic is RESTeasy and it relies on other libraries to do the actual serialization of Java objects. For example, JSON serialization is done by Jackson. You also noticed the exceptions thrown by the methods in the TripService interface. When an exception is throw, RESTeasy will transform it into a HTTP ERROR code. The default code is HTTP 500, but it can be overridden by your own exception mappers. We will add exception mappers to the project in one of our next blog posts. We further leave it up to you to study the implementation of our interface in the TripServiceImpl class which you find in the com.qmino.santorini.service package in the santorini-services module.
Before we can start testing our services, we need to wire our code together and make sure RESTeasy can do its magic.
Wiring up
There are three steps remaining where we need to go through to get our RESTful services going:
- configuring Spring dependency injection in applicationContext.xml
- setting the servlet configuration right in web.xml to kickstart Spring and RESTeasy
- checking all library dependencies in our maven pom.xml files
If you explored the implementation of the REST interfaces in TripServiceImpl, you may have noticed the @Autowired fields at the top of the class. These fields point to Spring components that are instantiated and wired to those fields by the Spring framework. The @Autowired tag can only be used inside classes that themselves are instantiated as Spring components. Our TripServiceImpl class is a Spring component because it has the @Service tag listed above its class definition. The tags @Component and @Repository are also used in other classes to point out those classes that are Spring components. In order to configure the discovery of those tags by the Spring framework, we need to add a file called applicationContext.xml to the resources directory of the santorini-services module. To go there, please checkout the tag wiringup (git checkout -f wiringup) from our repository. In the applicationContext.xml file, you see an <context:annotation-config/> entry that tells Spring that annotation-based inversion of control (IoC) should be applied, which activates the @Autowired functionality. Further down the file, you see the <context:component-scan base-package=”com.qmino.santorini”/> component scan entry, which tells Spring where in the codebase to scan for components. In our case, we simply let Spring scan our whole project. Finally, there is also a ResteasyJacksonProvider bean defined as a Spring component. This provider class is needed to activate JSON serialization and deserialization on our REST services.
In the next step, we will configure the entry points for Spring and RESTeasy that bootstrap both frameworks in a servlet container. This is done in a file called web.xml that sits in the src/main/webapp/WEB-INF directory of the santorini-web module. From top to bottom, we first find the contextConfigLocation parameter, which tells the Spring loader where to find the Spring configuration file that we called applicationContext.xml. Next we get two servlet context listener classes called ResteasyBootstrap that (as the name suspects) bootstraps the RESTeasy framework and SpringContextLoaderListener with a similar job description to launch Spring. Given that we got Spring and RESTeasy bootstrapped, we now just have to set up a servlet that accepts HTTP calls and routes them to our RESTful services. This is taken care of by the HttpServletDispatcher servlet definition that is mapped to the url-pattern /rest/*. This means that all HTTP calls on http://yourhost/santorini/rest/* will be routed to your RESTful services. We also have a welcome file registered that points to index.jsp in case someone browses to the root URL of our services. In the future, we could set up a client application on this URL (just another reason watch our blog 😉
Last, but not least, we need to make sure we have all the library dependencies in place so that the application can be compiled. We know that maven takes care of the job of fetching all dependencies, but we have to define those dependencies in our pom.xml files first. We will not go into the details of how maven works since it would bring us too far way from the purpose of this blog, but we will give a brief description of the dependencies we have to include in our project to get it running. We start off from the parent pom.xml file that you find in the root of the santorini project. The parent pom first defines the three modules (santorini-api, santorini-services and santorini-web), which your are already familiar with, and then a set of version number properties that are used in the other pom.xml files and one build property that indicates that the source file encoding of our project is UTF-8. Next, there is the servlet dependency that we need to hook into the servlet API. As you can see, this is a provided dependency, which means that we will not build it into our own executable file (war file). The servlet library (jar file) will be provided by our servlet container (Tomcat). The last entry in the root pom.xml file is the maven compiler plugin which is there for obvious reasons. We now move on to the pom.xml file of our santorini-api module. Its content is fairly simple and straightforward: we only need JAXRS for the REST annotations and the jackson mapper for the Jackson-specific annotations (which we will use in one of our next blog posts). The pom.xml file of our santorini-services module is a bit more elaborate since most of the implementation work is done here and so the many libraries are called upon. Our first dependency is our own santorini-api module because we’re implementing the api interfaces in the santorini-services module. We further need the Spring core and the Spring context libraries for the base IoC functionality and support for the @Service tags. RESTeasy falls apart in three dependencies that are required: the jaxrs-api is the JAXRS implementation, resteasy-spring integrates resteasy with spring and resteasy-jackson-provider makes the provider available that handles the JSON (de)serialization of TO’s to HTTP bodies and vice versa. The Google guava dependency is a very handy utility library we like to use often (e.g. Strings.isNullOrEmpty(…) in TripServiceImpl). We finally move to the last pom.xml which we find in the santorini-web module. The first important thing you should not overlook is the packaging tag here. The santorini-web module is compiled to a war file, whereas the other modules were compiled as jar files. This is essential to package the project into a working servlet package. The compiled war file will contain all of its dependencies. If you want to see the content of the war file, unzip it (it is actually a zip file, just like a jar file is). To build the war file, run “mvn install” in a terminal window (go to the santorini project root first) and you will find the war under santorini-web/target. There are only two dependencies needed in the pom.xml file of the santorini-web module: the santorini-services dependency and the spring-web dependency. The latter is required to get the Spring servlet context loader listener. Now go on and compile the project!
A final look at our RESTful service specification
Before we start up the application for the first time, we will have a final look at our RESTful service specifications, so that we know exactly what to test once we’re live. A nice and brilliantly easy-to-use REST API generation tool is MireDot. The tool is free for open source projects and accessible at a fairly low rate for commercial products. Checkout the tag miredot (git checkout -f miredot) to get the configuration inserted into our santorini-api pom.xml file. Adding an entry to the pom.xml file of the module that contains the JAXRS and Jackson annotations is really the only thing you need to do bring your documentation into the skies. Since the tool integrates with the maven build process, you simply have to rebuild the project (mvn install). Now go to the directory santorini-api/target/miredot and open the index.html file to see your REST documentation. Or you can also directly browse the live version of this site.
The generated MireDot website lists all available REST interfaces by their parameterized URLs, Accept and Content-Type headers and gives a detailed description of the JSON data that is sent to or received from your services. Not only the JSON structure but also the data types of each field is documented. On the right, there is a hierarchical overview by the REST paths to each service and search functionality enables you to query your services by URL or path parts. Using this tool, you will never again have trouble finding your way to the right services, even when you have services by the hundreds.
Testing the services
To test out the santorini services, you need to deploy the war file you compiled previously in a servlet container. If you don’t have one yet, install Tomcat first. Deploying is as easy as putting the compiled war file into the webapps directory of your Tomcat version and starting the server. If you’re not familiar with deploying a war file, you can go through the next steps to get it running from within your IntelliJ IDE. From the Run -> Edit Configurations menu select your Tomcat application server in the Server tab and then go to the Deployment tab to click on the + sign to add the “santorini-web:war exploded” artifact. In the box Application context, you enter “/santorini” (see figure below). Once you have configured this, press the green play button at the top of your IDE and the santorini project will be compiled and deployed. A browser window should be opened automatically to point to the root of our application (typically http://localhost:8080/santorini/). It will show the rendered content of the index.jsp file.

Deploying the santorini project in IntelliJ
Since we didn’t write any client yet, we cannot do much from the rendered index.jsp file. We will take a shortcut here and test our services directly on bare HTTP calls. To do this, we need a REST client. If you don’t have one yet, I would advise you to use the RESTclient plugin you can install on the Firefox browser.
Have a look at our first service: GET http://localhost:8080/santorini/rest/trips/ (change localhost:8080 if your host:port combination is different). The service expects “application/json” as Accept header and gives you all available trips in the system. Enter these parameters in your REST client (see image below for an example) end send it to the server. You will receive “[]” as the body of your reply. It is the JSON representation of an empty list. That’s a logical result since there is no data in our system yet.
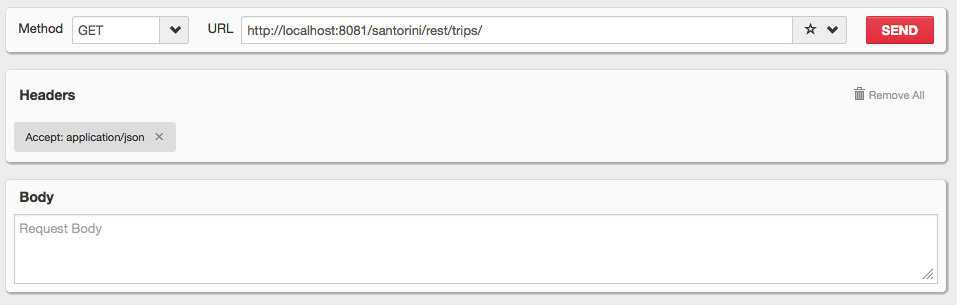
- RESTclient GET all trips
Checkout the tag dummydata (git checkout -f dummydata) from the santorini project, restart the application server and repeat the above steps. You now get a number of trips listed as JSON data in the body of the response. Also try to fetch the details of the trip with id 2 via http://localhost:8080/santorini/rest/trips/2 and find the difference between the data about this trip that was sent in the first service and try to find out in the code why it’s different. This flexibility is why we like to work with Transfer Objects.
Let’s now try to book a trip. To do this, we need to use the POST method on the URL http://localhost:8081/santorini/rest/trips/book. Because we are going to send data in the request body, we need to tell the service in which format we’re going to send it, so we add the Content-Type header to the request and give it the value “application/json”, this is the same value as the Accept header. This means we’re sending JSON data to the server and we expect to get JSON data back. In your rest client, paste the following JSON data in the body of the request (change the values if you want). Have a look at the request confirmation data that is returned by the service and notice how the available places are reduced each time travelers have booked a trip. You will eventually get an error code back when trying to book a trip when the numer of travelers exceed the availability. By using exception mappers, the error code body can be configured to your wishes, but we’ll keep that for another blog post. You may also have noticed that the date format has a strange form. It is expressed in seconds since 1 January 1970. Although this is a valid date format, a more human-readable format would be nicer. In order to achieve this, you have to add a custom date (de)serializer to the Jackson framework.
{
   "tripId": 2,
   "travelers": [
   {
     "firstName": "John",
     "lastName": "Smith",
     "passportNumber": "123456",
     "street": "Sunset Av.",
     "houseNumber": "1",
     "zip": "12345",
     "city": "Brussels",
     "country": "Belgium",
     "phoneNumber": "32123456789",
     "emailAddress": "john@somedomain.com"
   },
   {
     "firstName": "Johnny",
     "lastName": "Smith",
     "passportNumber": "123457",
     "street": "Sunset Av.",
     "houseNumber": "2",
     "zip": "12345",
     "city": "Brussels",
     "country": "Belgium",
     "phoneNumber": "32123456780",
     "emailAddress": "johnny@somedomain.com"
   }
   ]
 }
If you try the above services without setting the Accept or Content-Type header, you will notice that they’ll also do the job. It is, however, a very bad habit to omit these headers. Especially the Accept header must always be set. The main reason is that the server can add a service on the same URL but with another @Produces tag, for example to give you the option to get the result back in XML rather than in JSON format. If you haven’t set the Accept header in your Ajax calls in your client, the client will break. The client’s request will be sent to the first matching service by RESTeasy and that might be the XML version of the service, breaking the client code that wants to process the result as JSON data. Another good habit is setting a REST version number in the Accept header. The service @Produces tag might then look like @Produces(“application/vnd.qmino.santorini-v1.0+json”). This header is a vendor-specific header that embodies a version number (v1.0) in it. This enables you to evolve your REST services over time and letting older versions sit next to the newer versions. Remark that this requires you to even put an Accept header on calls that have no return value!
From here
Our goal is to further elaborate on this project and talk about many other tips and tricks you can add to make this a rich and powerful REST application. Please follow our blog if you want to know more and leave your comments if you like it or if you have a topic request for a next post. Topics that seem interesting are:
- adding a real database and use Hibernate to store and retrieve data in a real transactional context via DAOs,
- adding exception mappers,
- elaborate on structuring REST URLs,
- adding advanced Jackson mapping to more complex TOs,
- adding custom JSON (de)serializers (e.g. to format dates),
- adding client code that executes Ajax calls on our REST services,
- adding logging,
- …

Thanks a lot.. Very useful tutorial.. I am a newbiew and I am setting up a project based on HTML5 client and rest webservices in backend deployed on JBOSS. Your tutorial will be useful for me to setup basic project structure.
You have mentioned few other points like:adding a real database and use Hibernate to store and retrieve data in a real transactional context via DAOs,
adding exception mappers,
elaborate on structuring REST URLs,
adding advanced Jackson mapping to more complex TOs,
adding custom JSON (de)serializers (e.g. to format dates),
adding client code that executes Ajax calls on our REST services,
adding logging,
Can you also post a example of each point or at least give us references?