Setting up RESTful services on a J2EE service oriented architecture
This is the first in a series of blog posts in which we give an answer to the question “How do I setup RESTful services on a J2EE technology stack?”. We begin with a bare minimal codebase which we will gradually expand in future articles. Working code samples will guide you through the process of understanding REST concepts and they will teach you how the chosen technology handles the job. Technology cornerstones are Java, Spring, JAX-RS (with RestEasy) and Hibernate. There are several other libraries, supporting tools and applications that we will familiarize you with at the right time. For example, we use Postgres as database platform and Tomcat as application server, our project is built with maven and our codebase is hosted on github.
On RESTful services
REST is basically centered around the abstract concept of ‘resources’ (URLs) and performing operations on these resources via the HTTP protocol. A RESTful service should always be stateless. This is key to a scalable architecture. It enables you to multiply your service instances over any number of (virtual) servers. Examples of public REST interfaces are the Graph API of Facebook and the Flickr REST API.
You need a strict separation between client and server concerns. Clients manage the user interface (if any) and user state whereas servers don’t keep any user state between requests but execute complex business processes during each request and handle persistent data storage.
There is a summarizing WikiPedia page on REST and there are several presentations on REST on InfoQ that serve as good resources in case you want to better align yourself with the REST concepts first. We go straight to the practicalities of setting up your first REST project now.
Setting up the project

The santorini project structure
We always create seperate modules for the service’s (REST) API and its implementation. This is a natural separation, prevents you to accidentally use implementation classes in the API and allows you to distribute the API module to clients. We also create a separate web module for client code and the servlet entry point.
The resulting maven structure is shown in the figure on the right. Notice that there are three pom.xml files: one parent pom.xml in the root folder and one pom.xml for each module. Before continuing reading the article, this is a good point to get your hands on the accompanying code.
Checkout the codebase using git by executing – git clone https://github.com/Qmino/Santorini.git – in a terminal window or using one of the many graphical git clients. One brilliant client is definitely the free SourceTree app from Atlassian. Once you have the repository cloned, update it to the first revision by executing git checkout -f initial or use your graphical git client. Open the project in your preferred IDE (likely Eclipse or IntelliJ) or build the code by executing mvn install from the root of the codebase. You obviously need to have Java and maven installed to get the build process going.
You may have noticed the recurring directory structure under each module. This is the default maven source layout for Java applications. Our Java packages will live under the java folder and our non-java files such as configuration files go under resources. We will later also add the test directory under src. Maven is not only a build tool, but also a dependency management tool that automatically fetches your project’s library dependencies from central repositories. Those dependencies are configured in the pom.xml files we mentioned earlier. Just ignore those files a little longer. We will explain the dependencies we need after creating our domain model and a handful initial services.

The initial Santorini model
The travel agency
Our sample code implements web services for an online travel agency with the single purpose of explaining the ideas behind creating REST services to expose a business online. Since it is a toy application, it may obviously lack some of the more realistic processes a business of that nature needs. Just bear in mind that it is made for educational purposes. Now, let’s design…
Our first user stories will be:
- A traveler can view all available trips.
- A traveler can view a detailed description of a selected trip.
- A traveler can book a trip.
The self-explaining concepts in the initial domain model we built to support these services are Trip, Traveler and Booking. They are related to one another as shown in the figure on the left. Apart from the trip details, each trip maintains a list of bookings on that trip. A booking relates a traveler to a specific trip and the traveler object stores a traveler’s details together with his booked trips. Checkout the tag firststories (git checkout -f firststories) from our repository to see this model in the santorini-services module in your IDE.
In the next figure you see the TripService interface that contains our public service API. You can find it in the com.qmino.santorini.service package inside the santorini-api module. Here is where the first REST concepts seep in by means of Java annotations. @Path points out where the service should be hosted relative to the base URL that points to where our war file will be hosted on our application container (e.g. Tomcat server). The path annotation on the interface level sets the start path for all methods in the interface, whereas the path annotation on the methods complete the URL for a specific REST resource. Path parts that sit between braces such as {tripId} are parameterized. That means that all resources that match /rest/trips/{tripId} where {tripId} is replaced by a Long value will execute the method getTripInfo when a request is sent to it. However, not any request on this URL will execute the method. The @GET annotation and @Produces(MediaType.APPLICATION_JSON) annotation together point out that only HTTP GET methods accompanied with an Accept header with the value application/json will be routed to the getTripInfo method. The @PathParam(“tripId”) injects the path parameter tripId into the methods call’s parameter tripId. Together, these method annotations define how a REST request is transformed into a Java method call.
@Path("/rest/trips")
public interface TripService {
   @GET
   @Path("/")
   @Produces(MediaType.APPLICATION_JSON)
   List getAllAvailableTrips();

   @GET
   @Path("/{tripId}")
   @Produces(MediaType.APPLICATION_JSON)
   TripTo getTripInfo(@PathParam("tripId") Long tripId)
      throws NoSuchElementException;

   @POST
   @Path("/book")
   @Produces(MediaType.APPLICATION_JSON)
   @Consumes(MediaType.APPLICATION_JSON)
   BookingConfirmationTo bookTrip(BookingRequestTo bookingRequestTo)
      throws BookingException;
}
The result of the method call on getTripInfo is a TripTo object. TripTo is a Transfer Object (TO), sometimes also called Data Transfer Object (DTO), but we prefer the shorter term. Transfer objects define which data can be sent to or can result from calling upon a REST resource. Since maintaining a good separation of concerns in building a software system is a good thing, we should never use any domain objects directly in the service interfaces. It actually can’t be done since we defined our domain concepts in a separate module (santorini-services) and, as we will show later, the santorini-services module will depend on santorini-api and not the other way around. Finally, we have one annotation left: @Consumes(MediaType.APPLICATION_JSON). This annotation defines how the Content-Type header of a REST request must look like, e.g. application/json. The bookTrip method has a method parameter bookingRequestTo that is not preceded by an annotation. Such parameter defines the expected request body, in this case a BookingRequestTo object.
Now you may wonder how the transfer objects, which are Java objects, are transformed into their appropriate request or result format, JSON in our case. It is done by the same magic that exposes the REST resources based on the above annotations and routes requests on them to the appropriate Java method. The framework that handles the magic is RESTeasy and it relies on other libraries to do the actual serialization of Java objects. For example, JSON serialization is done by Jackson. You also noticed the exceptions thrown by the methods in the TripService interface. When an exception is throw, RESTeasy will transform it into a HTTP ERROR code. The default code is HTTP 500, but it can be overridden by your own exception mappers. We will add exception mappers to the project in one of our next blog posts. We further leave it up to you to study the implementation of our interface in the TripServiceImpl class which you find in the com.qmino.santorini.service package in the santorini-services module.
Before we can start testing our services, we need to wire our code together and make sure RESTeasy can do its magic.
Wiring up
There are three steps remaining where we need to go through to get our RESTful services going:
- configuring Spring dependency injection in applicationContext.xml
- setting the servlet configuration right in web.xml to kickstart Spring and RESTeasy
- checking all library dependencies in our maven pom.xml files
If you explored the implementation of the REST interfaces in TripServiceImpl, you may have noticed the @Autowired fields at the top of the class. These fields point to Spring components that are instantiated and wired to those fields by the Spring framework. The @Autowired tag can only be used inside classes that themselves are instantiated as Spring components. Our TripServiceImpl class is a Spring component because it has the @Service tag listed above its class definition. The tags @Component and @Repository are also used in other classes to point out those classes that are Spring components. In order to configure the discovery of those tags by the Spring framework, we need to add a file called applicationContext.xml to the resources directory of the santorini-services module. To go there, please checkout the tag wiringup (git checkout -f wiringup) from our repository. In the applicationContext.xml file, you see an <context:annotation-config/> entry that tells Spring that annotation-based inversion of control (IoC) should be applied, which activates the @Autowired functionality. Further down the file, you see the <context:component-scan base-package=”com.qmino.santorini”/> component scan entry, which tells Spring where in the codebase to scan for components. In our case, we simply let Spring scan our whole project. Finally, there is also a ResteasyJacksonProvider bean defined as a Spring component. This provider class is needed to activate JSON serialization and deserialization on our REST services.
In the next step, we will configure the entry points for Spring and RESTeasy that bootstrap both frameworks in a servlet container. This is done in a file called web.xml that sits in the src/main/webapp/WEB-INF directory of the santorini-web module. From top to bottom, we first find the contextConfigLocation parameter, which tells the Spring loader where to find the Spring configuration file that we called applicationContext.xml. Next we get two servlet context listener classes called ResteasyBootstrap that (as the name suspects) bootstraps the RESTeasy framework and SpringContextLoaderListener with a similar job description to launch Spring. Given that we got Spring and RESTeasy bootstrapped, we now just have to set up a servlet that accepts HTTP calls and routes them to our RESTful services. This is taken care of by the HttpServletDispatcher servlet definition that is mapped to the url-pattern /rest/*. This means that all HTTP calls on http://yourhost/santorini/rest/* will be routed to your RESTful services. We also have a welcome file registered that points to index.jsp in case someone browses to the root URL of our services. In the future, we could set up a client application on this URL (just another reason watch our blog 😉
Last, but not least, we need to make sure we have all the library dependencies in place so that the application can be compiled. We know that maven takes care of the job of fetching all dependencies, but we have to define those dependencies in our pom.xml files first. We will not go into the details of how maven works since it would bring us too far way from the purpose of this blog, but we will give a brief description of the dependencies we have to include in our project to get it running. We start off from the parent pom.xml file that you find in the root of the santorini project. The parent pom first defines the three modules (santorini-api, santorini-services and santorini-web), which your are already familiar with, and then a set of version number properties that are used in the other pom.xml files and one build property that indicates that the source file encoding of our project is UTF-8. Next, there is the servlet dependency that we need to hook into the servlet API. As you can see, this is a provided dependency, which means that we will not build it into our own executable file (war file). The servlet library (jar file) will be provided by our servlet container (Tomcat). The last entry in the root pom.xml file is the maven compiler plugin which is there for obvious reasons. We now move on to the pom.xml file of our santorini-api module. Its content is fairly simple and straightforward: we only need JAXRS for the REST annotations and the jackson mapper for the Jackson-specific annotations (which we will use in one of our next blog posts). The pom.xml file of our santorini-services module is a bit more elaborate since most of the implementation work is done here and so the many libraries are called upon. Our first dependency is our own santorini-api module because we’re implementing the api interfaces in the santorini-services module. We further need the Spring core and the Spring context libraries for the base IoC functionality and support for the @Service tags. RESTeasy falls apart in three dependencies that are required: the jaxrs-api is the JAXRS implementation, resteasy-spring integrates resteasy with spring and resteasy-jackson-provider makes the provider available that handles the JSON (de)serialization of TO’s to HTTP bodies and vice versa. The Google guava dependency is a very handy utility library we like to use often (e.g. Strings.isNullOrEmpty(…) in TripServiceImpl). We finally move to the last pom.xml which we find in the santorini-web module. The first important thing you should not overlook is the packaging tag here. The santorini-web module is compiled to a war file, whereas the other modules were compiled as jar files. This is essential to package the project into a working servlet package. The compiled war file will contain all of its dependencies. If you want to see the content of the war file, unzip it (it is actually a zip file, just like a jar file is). To build the war file, run “mvn install” in a terminal window (go to the santorini project root first) and you will find the war under santorini-web/target. There are only two dependencies needed in the pom.xml file of the santorini-web module: the santorini-services dependency and the spring-web dependency. The latter is required to get the Spring servlet context loader listener. Now go on and compile the project!
A final look at our RESTful service specification
Before we start up the application for the first time, we will have a final look at our RESTful service specifications, so that we know exactly what to test once we’re live. A nice and brilliantly easy-to-use REST API generation tool is MireDot. The tool is free for open source projects and accessible at a fairly low rate for commercial products. Checkout the tag miredot (git checkout -f miredot) to get the configuration inserted into our santorini-api pom.xml file. Adding an entry to the pom.xml file of the module that contains the JAXRS and Jackson annotations is really the only thing you need to do bring your documentation into the skies. Since the tool integrates with the maven build process, you simply have to rebuild the project (mvn install). Now go to the directory santorini-api/target/miredot and open the index.html file to see your REST documentation. Or you can also directly browse the live version of this site.
The generated MireDot website lists all available REST interfaces by their parameterized URLs, Accept and Content-Type headers and gives a detailed description of the JSON data that is sent to or received from your services. Not only the JSON structure but also the data types of each field is documented. On the right, there is a hierarchical overview by the REST paths to each service and search functionality enables you to query your services by URL or path parts. Using this tool, you will never again have trouble finding your way to the right services, even when you have services by the hundreds.
Testing the services
To test out the santorini services, you need to deploy the war file you compiled previously in a servlet container. If you don’t have one yet, install Tomcat first. Deploying is as easy as putting the compiled war file into the webapps directory of your Tomcat version and starting the server. If you’re not familiar with deploying a war file, you can go through the next steps to get it running from within your IntelliJ IDE. From the Run -> Edit Configurations menu select your Tomcat application server in the Server tab and then go to the Deployment tab to click on the + sign to add the “santorini-web:war exploded” artifact. In the box Application context, you enter “/santorini” (see figure below). Once you have configured this, press the green play button at the top of your IDE and the santorini project will be compiled and deployed. A browser window should be opened automatically to point to the root of our application (typically http://localhost:8080/santorini/). It will show the rendered content of the index.jsp file.

Deploying the santorini project in IntelliJ
Since we didn’t write any client yet, we cannot do much from the rendered index.jsp file. We will take a shortcut here and test our services directly on bare HTTP calls. To do this, we need a REST client. If you don’t have one yet, I would advise you to use the RESTclient plugin you can install on the Firefox browser.
Have a look at our first service: GET http://localhost:8080/santorini/rest/trips/ (change localhost:8080 if your host:port combination is different). The service expects “application/json” as Accept header and gives you all available trips in the system. Enter these parameters in your REST client (see image below for an example) end send it to the server. You will receive “[]” as the body of your reply. It is the JSON representation of an empty list. That’s a logical result since there is no data in our system yet.
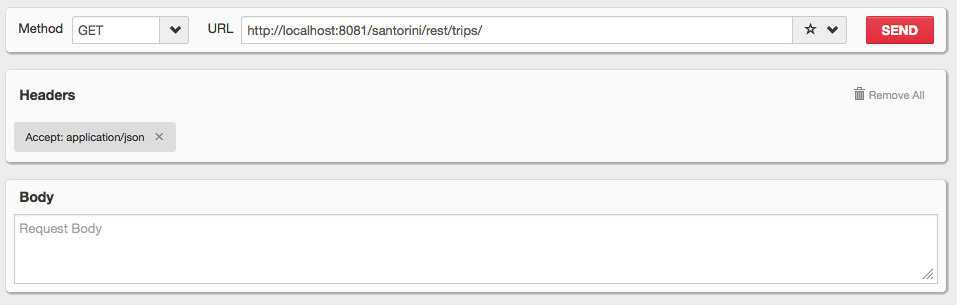
- RESTclient GET all trips
Checkout the tag dummydata (git checkout -f dummydata) from the santorini project, restart the application server and repeat the above steps. You now get a number of trips listed as JSON data in the body of the response. Also try to fetch the details of the trip with id 2 via http://localhost:8080/santorini/rest/trips/2 and find the difference between the data about this trip that was sent in the first service and try to find out in the code why it’s different. This flexibility is why we like to work with Transfer Objects.
Let’s now try to book a trip. To do this, we need to use the POST method on the URL http://localhost:8081/santorini/rest/trips/book. Because we are going to send data in the request body, we need to tell the service in which format we’re going to send it, so we add the Content-Type header to the request and give it the value “application/json”, this is the same value as the Accept header. This means we’re sending JSON data to the server and we expect to get JSON data back. In your rest client, paste the following JSON data in the body of the request (change the values if you want). Have a look at the request confirmation data that is returned by the service and notice how the available places are reduced each time travelers have booked a trip. You will eventually get an error code back when trying to book a trip when the numer of travelers exceed the availability. By using exception mappers, the error code body can be configured to your wishes, but we’ll keep that for another blog post. You may also have noticed that the date format has a strange form. It is expressed in seconds since 1 January 1970. Although this is a valid date format, a more human-readable format would be nicer. In order to achieve this, you have to add a custom date (de)serializer to the Jackson framework.
{
   "tripId": 2,
   "travelers": [
   {
     "firstName": "John",
     "lastName": "Smith",
     "passportNumber": "123456",
     "street": "Sunset Av.",
     "houseNumber": "1",
     "zip": "12345",
     "city": "Brussels",
     "country": "Belgium",
     "phoneNumber": "32123456789",
     "emailAddress": "john@somedomain.com"
   },
   {
     "firstName": "Johnny",
     "lastName": "Smith",
     "passportNumber": "123457",
     "street": "Sunset Av.",
     "houseNumber": "2",
     "zip": "12345",
     "city": "Brussels",
     "country": "Belgium",
     "phoneNumber": "32123456780",
     "emailAddress": "johnny@somedomain.com"
   }
   ]
 }
If you try the above services without setting the Accept or Content-Type header, you will notice that they’ll also do the job. It is, however, a very bad habit to omit these headers. Especially the Accept header must always be set. The main reason is that the server can add a service on the same URL but with another @Produces tag, for example to give you the option to get the result back in XML rather than in JSON format. If you haven’t set the Accept header in your Ajax calls in your client, the client will break. The client’s request will be sent to the first matching service by RESTeasy and that might be the XML version of the service, breaking the client code that wants to process the result as JSON data. Another good habit is setting a REST version number in the Accept header. The service @Produces tag might then look like @Produces(“application/vnd.qmino.santorini-v1.0+json”). This header is a vendor-specific header that embodies a version number (v1.0) in it. This enables you to evolve your REST services over time and letting older versions sit next to the newer versions. Remark that this requires you to even put an Accept header on calls that have no return value!
From here
Our goal is to further elaborate on this project and talk about many other tips and tricks you can add to make this a rich and powerful REST application. Please follow our blog if you want to know more and leave your comments if you like it or if you have a topic request for a next post. Topics that seem interesting are:
- adding a real database and use Hibernate to store and retrieve data in a real transactional context via DAOs,
- adding exception mappers,
- elaborate on structuring REST URLs,
- adding advanced Jackson mapping to more complex TOs,
- adding custom JSON (de)serializers (e.g. to format dates),
- adding client code that executes Ajax calls on our REST services,
- adding logging,
- …
High Res Screenshots of WPF Apps
A while ago, I needed to take a few screenshots of our Point of Sale system to be printed on a large banner. Unfortunately, ordinary screenshots do not scale well. Since the native resolution of the application is only 1024×768, I got a very blurry image when printed. Not good!
Fortunately, WPF is vector based. This means that it is possible to render your application’s GUI in any resolution or with any DPI setting you like. To do so, we simply use the RenderTargetBitmap class. Its constructor takes the target DPI, size and pixel format. The Render method takes any visual and renders it according to the given settings. The RenderTargetBitmap is a BitmapSource, which can easily be saved with (for example) a PngBitmapEncoder.
// Determine size (if the visual is a UIElement)
UIElement uiElement = visual as UIElement;
if (uiElement != null)
{
  width = (int)uiElement.RenderSize.Width;
  height = (int)uiElement.RenderSize.Height;
}

// Render
var rtb = new RenderTargetBitmap(width, height,
                                 dpiX, dpiY,
                                 PixelFormats.Pbgra32);
rtb.Render(visual);

// Encode and save to PNG file
var enc = new PngBitmapEncoder();
enc.Frames.Add(SBitmapFrame.Create(bmp));
using (var stm = File.Create(filename))
  enc.Save(stm);
The images below show the difference between an ordinary screenshot (right) and a ‘screenshot’ taken with the technique described above (left). It’s clear that the left image is crisp and can be used for high quality printing while the right one quickly becomes pixellated when it is enlarged.
 |
 |
| High Resolution Screenshot | Ordinary Screenshot |
There is one caveat. We need to build this screenshot ability straight into the application itself since that is the only way to get a reference to the Visual we want to render, or is it? Tools such as Snoop, Crack.NET and Mole are able to show the compete visual tree, visual previews, etc. of WPF apps. This got me thinking. Apparently, these tools can somehow hook into or ‘take over’ other apps. I still don’t really get how they do this, but what I do know is that they provide access to any visual within any WPF application. Integrating high res screenshot capabilities in these applications is thus relatively easy.
I’ve done this for Snoop. The result can be downloaded here (just unzip and run).
EDIT: This is now integrated in Snoop (See first comment to this post, thanks Cory!). (Source: http://snoopwpf.codeplex.com/SourceControl/changeset/changes/65551)
This is what you’ll get:

Making screenshots with Snoop
Setting the Culture in WPF Applications
The culture of an application not only specifies its language but also more specific culture related things such as date (e.g., mm/dd/yy or dd/mm/yyy) and number formatting (1.23 or 1,23) and default currency.
Usually your application gets its culture from the operating system. In some cases, you might want to set it yourself. The most obvious way to set a culture pragmatically in C# is as follows.
xmlLanguage = XmlLanguage.GetLanguage("nl-BE");
Thread.CurrentThread.CurrentCulture = xmlLanguage;
Thread.CurrentThread.CurrentUICulture = xmlLanguage;
There are two caveats to this. First of all, this only sets the culture for a specific thread. To my knowledge, there is no way to set the culture application-wide so you will have to set the culture for each thread you create. If you only need the culture to localize the user interface, I suppose this is not required since the UI runs on a single thread anyway.
I thought this was all there was to it, until I used a binding in XAML which had a culture specific formatting string:
<TextBlock Text="{Binding Order.Price, StringFormat='{0:F2}'}"/>
Depending on the culture, the ‘F2’ formatting string produces “1.23” or “1,23”. The problem was that it did not format as I expected based on the previously set culture. By adding a DebugConverter to the binding, I was able to inspect which culture was used by the binding. It was ‘en-US’ instead of ‘nl-BE’, the former being the default culture used by a binding. Apparently, the culture used by the binding and passed to its (optional) converter, if not set explicitly by assigning the Binding.ConverterCulture property, can be set globally at the top element of the XAML document with the xml:lang attribute.
Alternatively, you can set the culture globally as follows (see this post on msdn).
FrameworkElement.LanguageProperty.OverrideMetadata(
    typeof( System.Windows.FrameworkElement ),
    new FrameworkPropertyMetadata(XmlLanguage.GetLanguage("nl-BE") ) );
From now on, each binding will use the nl-Be culture by default.
BIRT: Dynamic column visibility / Grouping on visible columns
Recently I needed to implement reporting for a project our company is involved in. Eclipse Birt was chosen as the underlying reporting framework and I got started. The standard Birt reporting tool allows you to quickly make nice looking reports by simply dragging and dropping variables from any data source on a page, selecting your sorting and grouping preferences and subsequently deploying them on a webserver using a servlet provided by the project. My reporting requirements, however, were a little complicated and in the end I ended up spending quite some time getting things working the way I wanted them to.
My situation was as follows:
- The datasource is a remote webservice which outputs csv data: the first row containing the titles/names of each property, all subsequent rows containing the actual data.
- All items have a length property
- The report should achieve a number of tasks
- The toplevel grouping property must be user selectable (ie: using a report parameter)
- At the end of each group, a sum must be made of all lengths of items within a group
- The user must be able to choose the visible columns (again using a report parameter)
- Within each group, there may be no duplicate lines: an additional grouping step is to be performed on all visible properties, adding the similar items lengths in the process
Let me provide you with a simple example to make things a little more clear. Suppose the datasource provides us with information regarding cabling. Cables have a number of properties, including a length. Assume the original data is as follows:
Manufacturer;Material;Color;Location;PricePerMeter;Length;ThicknessRadius
FactoryA;Plastic;White;Antwerp;2.5;14.9;2
FactoryA;Copper;White;Ghent;2;200;1.1
FactoryA;Copper;Red-Blue;Brussels;4;9;2
FactoryB;FiberOptic;White;Antwerp;12;25;0.9
FactoryB;FiberOptic;Green;Brussels;12;140;0.9
FactoryB;FiberOptic;Blue;Antwerp;12;14;0.9
Suppose the user selects Location as his primary grouping parameter, the default look of the report should be something like this:
Antwerp
    Factory A     Plastic     White      2.5     14.9     2
    Factory B     FiberOptic  White     12.0     25.0     0.9
    Factory B     FiberOptic  Blue      12.0     14.0     0.9

                                         Total Length:   53.9

Ghent
    Factory A     Copper      White      2.0    200.0     1.1

                                         Total Length   200.0

Brussels
    FactoryA      Copper      Red-Blue   4.0      9.0     2.0
    FactoryB      FiberOptic  Green     12.0    140.0     0.9

                                         Total Length   149.0
Now, if the user decides, however, that he’s only interested in the material and the length, he can hide the other columns. In this case, however, I want the report to automatically merge existing items based on visible data. The result would look as follows:
Antwerp
    Plastic     14.9
    FiberOptic  39.0

                                         Total Length:   53.9

Ghent
    Copper      200.0

                                         Total Length   200.0

Brussels
    Copper      9.0
    FiberOptic  140.0

                                         Total Length   149.0
Notice that the two fiberoptic cables in Antwerp are now reduced to a single line: the total length of fiberoptic cables in Antwerp is 39.
Now, how can we do this?
Importing an external CSV source into our report
In order to access a remote csv source, I implemented my own datasource. Implementing a datasource in itself is relatively well documented by the birt project, and few significant problems occured in this step.
My datasource uses a single Java-class: csvparser
import java.io.BufferedReader;
import java.io.IOException;
import java.io.InputStreamReader;
import java.net.URL;
import java.util.ArrayList;
import java.util.Collection;
import java.util.HashMap;
import java.util.List;

/**
 * Generic CSV date input parser for reporting services.
 *
 * @author Yves Vandewoude
 */
public class CsvParser {

 List<String> items;
 int count = 0;
 HashMap<String, Integer> columnMapping = new HashMap<String, Integer>();
 String[] current;

 /**
 * Load all elements from the original csv datasource.
 *
 * @param path
 */
 public void loadData(String path) {
 items = textRead(path);
 if (!items.isEmpty()) {
 String[] parts = items.remove(0).split(";");
 for (int i = 0; i < parts.length; i++) {
 columnMapping.put(parts[i], i);
 }
 }
 }

 /**
 * Retrieve all columns
 */
 public String[] getColumnNames()
 {
 return columnMapping.keySet().toArray(new String[columnMapping.size()]);
 }

 /**
 * Allows caller to determine the currently active element
 * @param number the number of the record to set as the current
 */
 public void setCurrent(int number) {
 if (number > items.size() - 1) {
 number = items.size() - 1;
 }
 current = items.get(number).split(";", -1);
 }

 /**
 * The number of elements in the dataset offered by this csvparser
 * @return the the number of elements
 */
 public int numberOfItems() {
 return items.size();
 }

 /**
 * Returns the value of the column with the given name at the currently active row.
 * @param column the name of the column
 * @return the value of the given column in the active row
 */
 public String getValue(String column) {
 if (current == null)
 return null;
 else {
 String result = current[columnMapping.get(column)];
 return result;
 }
 }

 /**
 * Private method, does the actual parsing.
 * @param path the path of the input-url
 * @return a list of strings, each string representing a single (unsplit) row of csv data
 */
 private List<String> textRead(String path) {
 BufferedReader br = null;
 List<String> result = new ArrayList<String>();
 try {
 URL url = new URL(path);
 br = new BufferedReader(new InputStreamReader(url.openStream()));
 String current = br.readLine();
 while (current != null) {
 result.add(current);
 current = br.readLine();
 }
 br.close();
 } catch (IOException ioe) {
 }
 return result;
 }
}
}
The class is relatively straightforward: it offers a method that retrieves the value of a certain column for the current row and exports all columns. Nothing special here.
The actual datasource is a scripted source which calls the above class (when testing, make sure the class is in your classpath). Only the open method of the script must be implemented:
// This will track your current row later on
count = 0;

// Create instance of the Controller class
controller = new Packages.be.vlaanderen.awv.CsvParser();

// Load the JSON Source
controller.loadData(params["URL"]);

// Calculate the total rows we will have
totalCount = controller.numberOfItems();
Note that you can perform additional parameterparsing here (such as parsing additional filter information that you wish to pass on to the underlying service by manipulating the url. I prefered to keep the above codesnippet short, so I did not do this.
Now we have our datasource, we need to create a dataset with our own source as its source. We add one output column for each field of our datasource. We also create one addition outputcolumn of type string, which I called filter. We then need to implement the fetch method of this dataset so that it uses our java csv parser for fetching its records.
if(count < totalCount){
 controller.setCurrent(count);
 allNames = controller.getColumnNames();
 var filter = "";
 for (var i = 0; i < allNames.length; i++){
 row[allNames[i]] = controller.getValue(allNames[i]);
 if (params["Hide"].value.indexOf(allNames[i]) == -1 & params["UnusedFields"].value.indexOf(allNames[i]) == -1)
 {
 filter = filter + "_" + row[allNames[i]];
 }
 }
row["filter"] = filter;
 count++;
 return true;
}
return false;
Don’t worry about that filterpart just yet. The essential part right now is that we simply execute
row[allNames[i]] = controller.getValue(allNames[i]);
for each column. Note that the fetch method must either return true or false, depending on whether another record is present in the datasource.
At this point, we have a valid datasource and dataset and can start building our report. We make a table, drag in our items and are ready to go. It’s a good idea to test your report at this point.
Hiding columns on demand
Hiding columns in a table is easy: we simply use the visibility feature of each column and assign an expression to it. In our case, we chose to use a single reportvariable of type string: “Hide”, which includes a comma seperated value list of all columns that should be hidden. Add this reportvariable to your report and then go to the layout window of your table, select Visibility and check for the presence of the name of your datacolumn in the hide parameter:
params["Hide"].value.indexOf("TypeI;") != -1 |
params["Hide"].value.lastIndexOf("TypeI") == params["Hide"].value.length-5
Basically, I here check if the TypeI is present in the csv of Hide. Do this for each column (evidently choosing the relevant variable present in your dataset).
You can now try to see if the columns are being hidden correctly simply by manipulating the Hide parameter of the report.
Merging on visible fields
So far so good. Now we need to hide duplicate rows and make a sum of their lengths. Basically what we want to do is make an additional group on all visible properties. And that is where filter comes in: basically, upon loading of the report, I create an additional dataset value (filter) which simply concatenates all visible properties except for length. The visible properties are simply all properties in the dataset except for those that are hidden and those that are simply not used in the table. For the latter, I created another report variable which I just statically set to a csv list of all properties present in the dataset but that are not used. The creation of the filter property is done in the fetch method for which the code is shown above.
The actual table then is a bit tricky: you create two groups. The toplevel group, is a group where you place a small expression based on a report parameter in the groupon field:
if (params["AggrTop"].value.toLowerCase() == "color")
{
row["color"];
}
else if  (params["AggrTop"].value.toLowerCase() == "location")
{
row["location"];
}

....
You get the idea. The innergroup is a just a group on filter. The trick is now not to place the information with all columns in the detailrow, but in the footer of the innergroup, since you want to add the lengths of all items in that group. You can do that last thing by simply creating an aggregation with the inner group as its scope.
Voila, here we go. I hope my explanation was helpful.
Imaging System with Ubuntu + PartImage
This article concisely describes how to create a bootable usb drive that can clone and restore a hard disc. I just wanted to write this down because I lost quite some time making this work twice already.
- Download and burn the Ubuntu Live CD v9.10 and boot from it.
- Attach the usb drive and format it (using GParted from the admin menu) in two partitions:
- fat32 (a few gigs suffices), where the bootable OS will be installed.
- ext3 (the rest), room for the images.
- Install the OS on the first partition and make bootable (admin menu -> create bootable usb drive)
- Eject the cd and boot from the usb drive
- Install PartImage: sudo apt-get update && sudo apt-get install partimage. You must first enable some repositories to make this work, see http://www.psychocats.net/ubuntu/sources
- You can now use PartImage to create and restore images.
How to Implement a Property
Below is a code snippet of how we implement non-trivial properties, involving event subscriptions and change notifications (through INotifyPropertyChanged). Unsubscribing from the old value’s events is particularly important to avoid memory leaks.
public Amount BatchAmount
{
  set
  {
    // Do nothing if the value hasn't changed (certainly avoid change notification)
    if (batchAmount == value)
      return;

    // Unsubscribe from the old value's events (prevent memory leak)
    if (batchAmount != null)
      batchAmount.PropertyChanged -= batchAmount_PropertyChanged;

    // Assign the new value
    batchAmount = value ?? new Amount(0, UnitPrice.Unit);

    // Subscribe on the new value's events
    batchAmount.PropertyChanged += batchAmount_PropertyChanged;

    // Notify property changed
    OnPropertyChanged("BatchAmount");
  }
}
Integrating Restlet 2.0 with Spring
I recently spent hours trying to find out how to use the restlet 2.0 framework in combination with a Spring container. My main conclusion is that there is no straightforward documentation available on how to do this. Either the documentation is Restlet 1.1 specific or it is written in riddles rather than in a clear explanation with working samples.
[Edit] Given our experience with RESTeasy today, I would advice anyone to use the JBoss RESTeasy framework. I recently wrote an article on how to get RESTeasy up and running in combination with Spring on a Tomcat application server.
The Restlet Spring documentation page proposes two approaches: Restlet as the main container or Spring as the main container. Since we chose to handle security with Spring, we want Spring as the main container. Here is how this approach is configured.
In our project’s web.xml configuration, we added Spring’s ContextLoaderListener to enable Spring as the main container and we added Restlet’s SpringServerServlet as the main servlet entry point. It is important to configure the org.restlet.application parameter and point it to the Bean name that represents your Restlet Application.
<?xml version="1.0" encoding="UTF-8"?>
<web-app id="WebApp_ID" version="2.4"
xmlns="http://java.sun.com/xml/ns/j2ee"
xmlns:xsi="http://www.w3.org/2001/XMLSchema-instance"
xsi:schemaLocation="http://java.sun.com/xml/ns/j2ee http://java.sun.com/xml/ns/j2ee/web-app_2_4.xsd">
<display-name>Your project name</display-name>
<listener>
<listener-class>org.springframework.web.context.ContextLoaderListener</listener-class>
</listener>
<context-param>
<param-name>contextConfigLocation</param-name>
classpath:applicationContext.xml
</context-param>
<servlet>
<servlet-name>rest</servlet-name>
<servlet-class>
org.restlet.ext.spring.SpringServerServlet
</servlet-class>
<init-param>
<param-name>org.restlet.application</param-name>
<param-value>application</param-value>
</init-param>
<load-on-startup>1</load-on-startup>
</servlet>
<servlet-mapping>
<servlet-name>rest</servlet-name>
/v1/*
</servlet-mapping>
</web-app>
In our applicationContext.xml file, we put the Bean definitions for our Restlet application and the router that handles the RESTfull requests. The RestletApplication class extends the Restlet Application class. Mind that there is no need to use classes from the com.noelios.restlet.ext.spring package, as many of the online examples suggest. Restlet 2.0 includes all that is needed to integrate with Spring.
<?xml version="1.0" encoding="UTF-8"?>
<beans xmlns="http://www.springframework.org/schema/beans"
xmlns:xsi="http://www.w3.org/2001/XMLSchema-instance"
xmlns:util="http://www.springframework.org/schema/util"
xsi:schemaLocation="http://www.springframework.org/schema/beans http://www.springframework.org/schema/beans/spring-beans-3.0.xsd http://www.springframework.org/schema/util http://www.springframework.org/schema/util/spring-util-3.0.xsd">
<bean id="router" class="org.restlet.ext.spring.SpringRouter">
<property name="attachments">
<map>
<entry key="/customers" value="com.company.resources.CustomerResource"/>
<entry key="/customer/{name}" value="com.company.resources.CustomerResource"/>
</map>
</property>
</bean>
<bean id="application" class="com.company.RestletApplication" scope="singleton">
<property name="root" ref="router"/>
</bean>
</beans>
For those people who use maven to fetch dependencies, here are our Restlet-specific maven dependencies:
<dependency>
<groupId>org.restlet</groupId>
<artifactId>org.restlet</artifactId>
<version>2.0-SNAPSHOT</version>
</dependency>
<dependency>
<groupId>org.restlet</groupId>
<artifactId>org.restlet.ext.servlet</artifactId>
<version>2.0-SNAPSHOT</version>
</dependency>
<dependency>
<groupId>org.restlet</groupId>
<artifactId>org.restlet.ext.json</artifactId>
<version>2.0-SNAPSHOT</version>
</dependency>
<dependency>
<groupId>org.restlet</groupId>
<artifactId>org.restlet.ext.spring</artifactId>
<version>2.0-SNAPSHOT</version>
</dependency>
Mercurial Branch-per-Feature Cheat Sheet
We recently started using the branch-per-feature commit strategy for our mercurial repository. Since this requires a bit more effort creating branches, committing, merging, etc., I have created a simple cheat sheet to help you with that.

Concatenate/Format Strings in XAML
Often, you will need to put dynamically concatenated strings on the screen. By this, I mean strings that are built at runtime by concatenating several static and non-static substrings. Something you would do in code as follows:
string formattedString = FirstName + " " + LastName;
// This is better performance-wise since a StringBuilder will be used internally, which means less objects will be created.
string betterFormattedString = string.Format("{0} {1}", FirstName, LastName);
To do this in XAML, you can take the naive approach below.
<StackPanel Orientation="Horizontal"/>
 <TextBlock Text="{Binding Name}"/>
 <TextBlock Text=" "/>
 <TextBlock Text="{Binding LastName}"/>
</StackPanel>
In this example, four UI elements are created: one StackPanel and three TextBlocks. This will have a performance impact since all these elements will need to go through a measurement and layout pass. In case this structure is used once or just a few times, you won’t notice this. However, if it is used in a datatemplate for use inside a list with many elements, you will notice a performance hit.
A better way to concatenate strings in XAML is shown below.
<TextBlock>
  <TextBlock.Text>
    <MultiBinding StringFormat="{}{0} {1}">
      <Binding Path="Name"/>
      <Binding Path="LastName"/>
    </MultiBinding>
  </TextBlock.Text>
</TextBlock>
In this case, we only create one UI element instead of four! Not only is this better performance-wise, it is also much more readable.
Hello world!
Welcome to WordPress.com. This is your first post. Edit or delete it and start blogging!
